Thursday, 8 December 2016

How To Create A Cover Image For Your Blog


The first thing your readers are going to see when they click your blog post is your cover image. In my early days of blogging I never did one, actually I never even thought of the idea or knew how important they were to blogging. The cover image is also what people on social media will see first, this will be the deciding moment of whether they read your blog or not. I am going to show you how to make a simple cover image using photoshop.

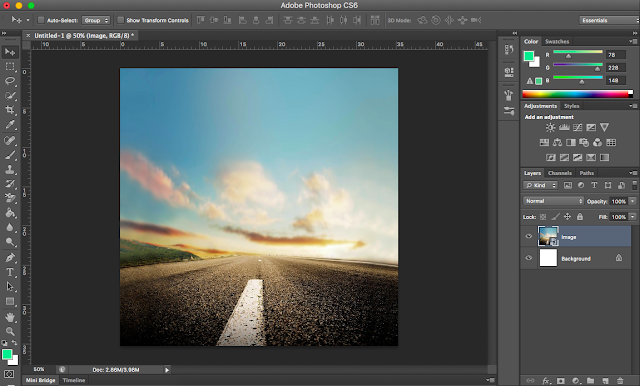
Step 1 - Create a blank document in photoshop, I use the size 1000 pixels by 1000 pixels and 72 pixels/inches for the resolution. Decide on a background image (have chosen a one from Flickr by Rae Che, which can be found here). Create a new layer and copy the background image on to this layer.

Blank Document > New Layer > Copy Image.


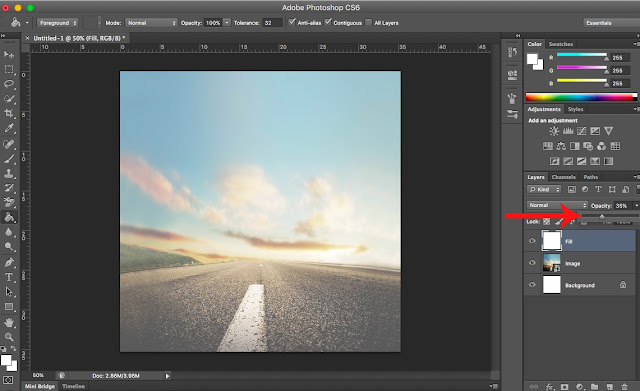
Step 2 -  Create another new layer and fill this white (right click on the gradient tool to find paint bucket tool).

New Layer [1] > Paint Bucket Tool [2] > Fill Layer White.


Step 3 - Use your opacity slider to chose a percentage that your background image will be visible. The lower the percentage, the more your background image will show (I have set mine to 35).

Opacity Slider.


Step 4 - Next create a new layer, making sure it is on top of the fill layer. Select the rectangle tool (make sure the fill is set to a colour and the stroke is set to transparent). Then change the opacity (i have mine set to 70%). 

New Layer [1] > Rectangle Tool [2] > Opacity [3].


Step 5 -  Create a new layer on top of the rectangle layer. Select the horizontal type tool and start typing over the rectangle (for the font I used DK Running Hipster found here, size is 200pt and colour I used the eyedropper tool and selected the colour of the sky #8ab0c3).

New Layer [1] > Horizontal Type Tool [2]. 


Step 6 - Now to create the border around the text, create a new layer and select the rectangle tool. Set the fill of the rectangle to no colour and change the stroke to a colour of your choice (mine is the same as the text #8ab0c3). Draw a rectangle around the text but make sure it is still inside of the first rectangle you did. 

New Layer [1] > Rectangle Tool [2] > Fill [3] > Stroke [4].


Finished, this can be changed, instead of doing a rectangle try a different shape, play with the colours and text. If you post any of your designs to Instagram, Twitter, Pinterest or Google +, feel free to tag me @samweatheritt. 


Wednesday, 30 November 2016

How to Create Brushes on Photoshop.


Have you ever wondered how to make your own photoshop brushes?
For most of my tutorials on photoshop I download premade brushes, normally off brusheezy. Today I will show you how simple it is to make your own.

Step 1 - Find an image that you want to turn into a brush, I will be using the infinity symbol. Once you have found an image open it in photoshop.

Find Image > Open in Photoshop.


Step 2 - If the image is coloured you will need to make it black and white. Go to image, then mode and choose grayscale.

Image > Mode > Grayscale.


Step 3 - Change the brightness/contrast on the image until you are happy with the image, select image, then adjustments, then brightness/contrast.

Image > Adjustments > Brightness/Contrast.


Step 4 - Choose the quick select tool or lasso tool and select the part or whole image that you want to turn to a brush (I selected the whole shape). Then select edit and define brush preset. Name the new brush and click Ok.

Quick Select or Lasso Tool [1] > Edit [2] > Define Brush Preset [3] > Rename > Ok.


Step 5 - Test your new brush. Open a blank document in photoshop and choose the brush tool and have a look on brush presets and the brush you have made will be in there.

New Document > Brush Tool [1] > Brush Presets [2].


Hope this helps and feel free to share any links to you brushes in the comment box or I can post a blog post sharing all the brushes. Thanks for reading.

Sam.

Friday, 25 November 2016

How to Create a Grunge Text Effect in Photoshop.


Hello, for this tutorial I will be showing you how I made a grunge text effect in photoshop, this tutorial is easy and took me about 5 minutes to do.


Step 1 - Open a new document in photoshop and fill the background (right click on the gradient tool for the fill tool) with a colour (i chose a dark green #1a4706). Create a new layer and use your horizontal type tool (for the font I used Bebas Neue, colour white and font size 90pt)

New Document > Fill Background [1] > New Layer  [2] > Horizontal Type Tool [3].


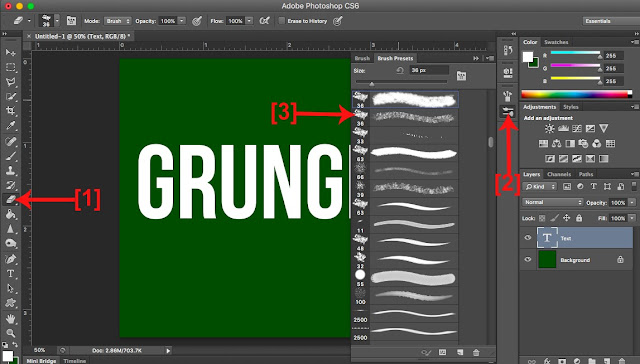
Step 2 - Select the eraser tool and look through the brush presets and choose the chalk preset. Now go around the text click to erase bits of the edges (make sure you are on the text layer).

Eraser Tool [1] > Brush Presets [2] > Chalk Preset [3] > Erase.


Step 3 - This step is optional, put a slight rotate on the text. 

Edit [1] > Transform [2] > Rotate [3].


Step 4 - Create a new layer and add some paint splatters. Select the brush tool and then brush presets to select paint splatters. I downloaded some splatters (they're actually named blood and splatter but these brushes worked better than the paint splatters and can be found here). Keep the colour white and change the shape and size of the brush every few splatters. 

New Layer [1] > Brush Tool [2] > Brush Presets [3].


Finished, this only took minutes to do, try different fonts, colours and paint tools and see the different results. Have fun.