The first thing your readers are going to see when they click your blog post is your cover image. In my early days of blogging I never did one, actually I never even thought of the idea or knew how important they were to blogging. The cover image is also what people on social media will see first, this will be the deciding moment of whether they read your blog or not. I am going to show you how to make a simple cover image using photoshop.
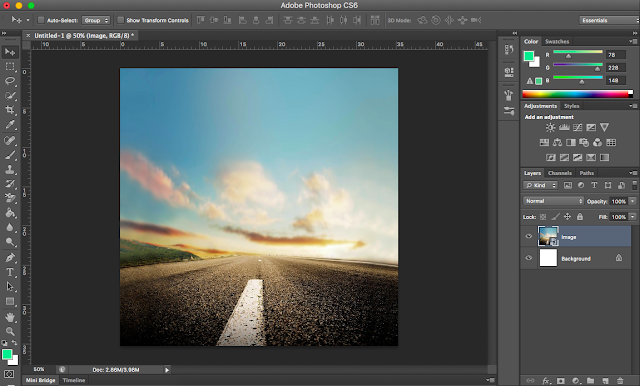
Step 1 - Create a blank document in photoshop, I use the size 1000 pixels by 1000 pixels and 72 pixels/inches for the resolution. Decide on a background image (have chosen a one from Flickr by Rae Che, which can be found here). Create a new layer and copy the background image on to this layer.
Blank Document > New Layer > Copy Image.
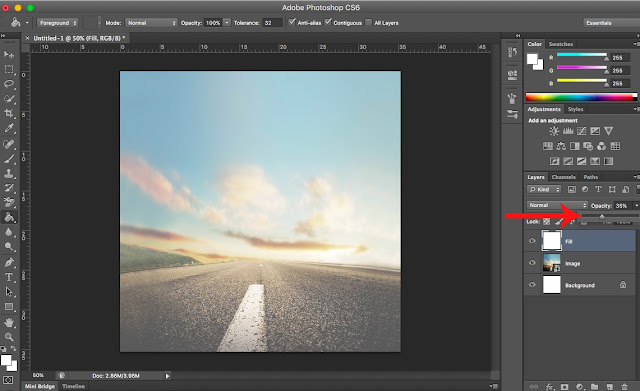
Step 2 - Create another new layer and fill this white (right click on the gradient tool to find paint bucket tool).
New Layer [1] > Paint Bucket Tool [2] > Fill Layer White.
Step 3 - Use your opacity slider to chose a percentage that your background image will be visible. The lower the percentage, the more your background image will show (I have set mine to 35).
Opacity Slider.
Step 4 - Next create a new layer, making sure it is on top of the fill layer. Select the rectangle tool (make sure the fill is set to a colour and the stroke is set to transparent). Then change the opacity (i have mine set to 70%).
New Layer [1] > Rectangle Tool [2] > Opacity [3].
Step 5 - Create a new layer on top of the rectangle layer. Select the horizontal type tool and start typing over the rectangle (for the font I used DK Running Hipster found here, size is 200pt and colour I used the eyedropper tool and selected the colour of the sky #8ab0c3).
New Layer [1] > Horizontal Type Tool [2].
Step 6 - Now to create the border around the text, create a new layer and select the rectangle tool. Set the fill of the rectangle to no colour and change the stroke to a colour of your choice (mine is the same as the text #8ab0c3). Draw a rectangle around the text but make sure it is still inside of the first rectangle you did.
New Layer [1] > Rectangle Tool [2] > Fill [3] > Stroke [4].
Finished, this can be changed, instead of doing a rectangle try a different shape, play with the colours and text. If you post any of your designs to Instagram, Twitter, Pinterest or Google +, feel free to tag me @samweatheritt.


0 comments:
Post a Comment