Hello, for this tutorial I will be showing you how I made a grunge text effect in photoshop, this tutorial is easy and took me about 5 minutes to do.
Step 1 - Open a new document in photoshop and fill the background (right click on the gradient tool for the fill tool) with a colour (i chose a dark green #1a4706). Create a new layer and use your horizontal type tool (for the font I used Bebas Neue, colour white and font size 90pt)
New Document > Fill Background [1] > New Layer [2] > Horizontal Type Tool [3].
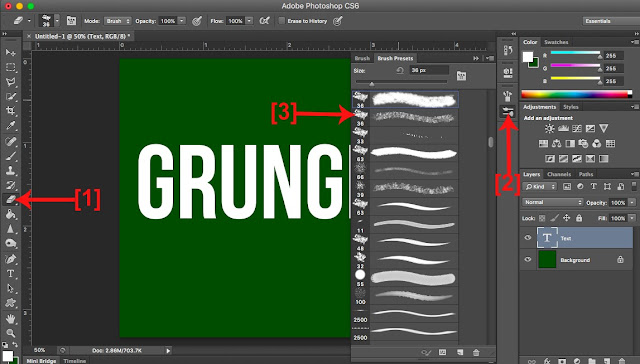
Step 2 - Select the eraser tool and look through the brush presets and choose the chalk preset. Now go around the text click to erase bits of the edges (make sure you are on the text layer).
Eraser Tool [1] > Brush Presets [2] > Chalk Preset [3] > Erase.
Step 3 - This step is optional, put a slight rotate on the text.
Edit [1] > Transform [2] > Rotate [3].
Step 4 - Create a new layer and add some paint splatters. Select the brush tool and then brush presets to select paint splatters. I downloaded some splatters (they're actually named blood and splatter but these brushes worked better than the paint splatters and can be found here). Keep the colour white and change the shape and size of the brush every few splatters.
New Layer [1] > Brush Tool [2] > Brush Presets [3].
Finished, this only took minutes to do, try different fonts, colours and paint tools and see the different results. Have fun.


0 comments:
Post a Comment