Wednesday, 30 November 2016

How to Create Brushes on Photoshop.


Have you ever wondered how to make your own photoshop brushes?
For most of my tutorials on photoshop I download premade brushes, normally off brusheezy. Today I will show you how simple it is to make your own.

Step 1 - Find an image that you want to turn into a brush, I will be using the infinity symbol. Once you have found an image open it in photoshop.

Find Image > Open in Photoshop.


Step 2 - If the image is coloured you will need to make it black and white. Go to image, then mode and choose grayscale.

Image > Mode > Grayscale.


Step 3 - Change the brightness/contrast on the image until you are happy with the image, select image, then adjustments, then brightness/contrast.

Image > Adjustments > Brightness/Contrast.


Step 4 - Choose the quick select tool or lasso tool and select the part or whole image that you want to turn to a brush (I selected the whole shape). Then select edit and define brush preset. Name the new brush and click Ok.

Quick Select or Lasso Tool [1] > Edit [2] > Define Brush Preset [3] > Rename > Ok.


Step 5 - Test your new brush. Open a blank document in photoshop and choose the brush tool and have a look on brush presets and the brush you have made will be in there.

New Document > Brush Tool [1] > Brush Presets [2].


Hope this helps and feel free to share any links to you brushes in the comment box or I can post a blog post sharing all the brushes. Thanks for reading.

Sam.

Friday, 25 November 2016

How to Create a Grunge Text Effect in Photoshop.


Hello, for this tutorial I will be showing you how I made a grunge text effect in photoshop, this tutorial is easy and took me about 5 minutes to do.


Step 1 - Open a new document in photoshop and fill the background (right click on the gradient tool for the fill tool) with a colour (i chose a dark green #1a4706). Create a new layer and use your horizontal type tool (for the font I used Bebas Neue, colour white and font size 90pt)

New Document > Fill Background [1] > New Layer  [2] > Horizontal Type Tool [3].


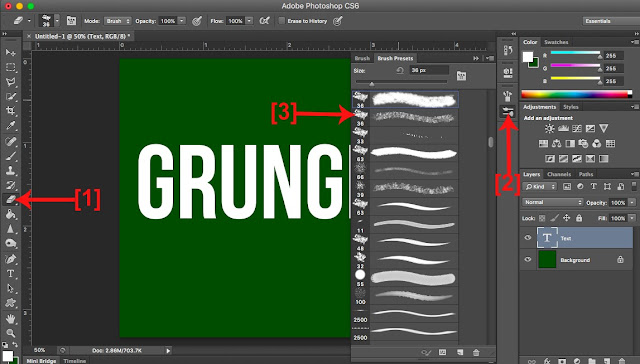
Step 2 - Select the eraser tool and look through the brush presets and choose the chalk preset. Now go around the text click to erase bits of the edges (make sure you are on the text layer).

Eraser Tool [1] > Brush Presets [2] > Chalk Preset [3] > Erase.


Step 3 - This step is optional, put a slight rotate on the text. 

Edit [1] > Transform [2] > Rotate [3].


Step 4 - Create a new layer and add some paint splatters. Select the brush tool and then brush presets to select paint splatters. I downloaded some splatters (they're actually named blood and splatter but these brushes worked better than the paint splatters and can be found here). Keep the colour white and change the shape and size of the brush every few splatters. 

New Layer [1] > Brush Tool [2] > Brush Presets [3].


Finished, this only took minutes to do, try different fonts, colours and paint tools and see the different results. Have fun.


Friday, 18 November 2016

Create A Watercolour Background On Photoshop


Recently I have seen a lot of banners, headers and quotation pictures using watercolour backgrounds. Looking around for tutorials on how to create this look in photoshop, I couldn't find a tutorial that was simple (I'm still learning the basics of photoshop). So I had a play around with photoshop and got some new brushes and figured out an easy way to make watercolour pictures.


Step 1 - Open a new document in photoshop and create a new layer, rename this layer to the first colour you will be using. 
Now you will need to get some watercolour paint brushes (these are the ones I downloaded). Unzip the file and click install, they will automatically appear in your photoshop brushes. 

New Document > New Layer.


Step 2 - Select the brush tool and then brush presets, the paint brushes that you have downloaded are in the shape of a paint splat. Choose the style of the paint brush, select the size and colour. Once you have chosen these you will need to set opacity to 25% and flow to 50%. Click on the document and a watercolour paint splat will appear on the document, the more times you click on the image the darker the paint will become (the one below was four clicks).

Brush Tool [1] > Brush Presets [2] > Size [3] > Colour [4] > Opacity 25% [5] > Flow 50% [6].


Step 3 - Create a new layer and rename this layer to the colour that you will be using. Choose a new colour and if you want to change your brush preset (use the ones you installed before) and change the size if needed. Repeat this step for every colour you want to use in the background.

New Layer [1] > Choose Colour [2] > Brush Preset [3].


Step 4 - Add a new layer and rename it text. Select horizontal type tool, choose your font (i chose lemon tuesday, which you can download from here). Choose your font size and colour and type your text. Make sure you set opacity and flow back to 100%.

New Layer [1] > Horizontal Type Tool [2] > Font > Size > Colour [3]. 


Step 5 - This step is optional, I decided to add a border to the text. For this, I downloaded a new brush tool which had two grunge type frames (found here). 
Create a new layer and rename it frame. Select the brush tool, then select the brush presets and the frames will be at the bottom of the list. Select a size and colour then place it on your document. If you decide to change the size of the frame select edit then free transform and change the size.

New Layer [1] > Brush Tool [2] > Brush Presets [3] > Size > Colour.


Finished, you can add as many different colour or layers as you like.


I love the watercolour design, so if you make any feel free to tag me on Instagram (@samweatheritt), I would love to see the different designs. Any questions you can ask me below or catch me on twitter. Have a good day.

Sam.


Tuesday, 15 November 2016

Create Rose Gold Glitter Text in Photoshop.


Have you ever looked at an image you have created in photoshop but think the text looks bland and boring? This tutorial will show you how to make the text rose gold glitter or any colour you choose and it is really simple to do. 


Step 1 - First you will need to decide on two different backgrounds, I have chosen a rose gold glitter background (found here) and a pastel colour (#d5ebee). Open both backgrounds in separate tabs, Then create a new (blank) document, now you should have three tabs open (glitter, pastel, blank). 

Step 2 - We now need to move both backgrounds into the blank document, click the tab that has the rose gold glitter background and then click select then click all. Once the background is selected it will have a flashy border around the whole document, now go to edit and click copy. Now go to you blank document and create a new layer, rename it rose gold (or anything you want, it makes it easier for me) and paste the background you have just selected. If it doesn't cover the whole document click edit and free transform and change the size.

Select [1] > All [1] > Edit [2] > Copy > New Document > New Layer [3] > Paste [4] > Edit > Free Transform [5]. 


Repeat step 2 for your second colour choice. So in the blank document you should now have three layers a background that is plain white,  a layer that has the glitter background and a layer that has your second colour. Make sure the second background layer is above the glitter layer

Step 3 - Create a new layer in the document you have copied the backgrounds too. Now you need to select the horizontal type mask tool (right click on horizontal type tool) and place it on your new layer and start typing. For the font I have used beautiful mess (found here) and font size is 450pt. 

New Layer [1] > Horizontal Type Mask Tool [2] > Font > Size.


Step 4 - Now you need to click back on your second background layer (pastel colour for me), once on this layer you need to select the magic eraser tool (right click on eraser tool). Then with the magic eraser tool click on the writing. 

Second background layer (pastel) [1] > Magic Eraser Tool [2] > Click On The Writing [3].


If anything on the photoshop picture is still selected or has flashing lines, go to select (at the top) and click on deselect. Hopefully this has helped and if you don't want to do the rose gold glitter background you can use any you like.

Sam  


Tuesday, 8 November 2016

How To Use Clipping Mask In Photoshop


Hello, for this tutorial I will be showing you how to make an image using clipping mask in photoshop. I am still learning how to use photoshop and been wanting to learn it for years but every time I look at it, it looks impossible to learn. So this tutorial is for beginners like me and if I can do it anyone can.

Step 1: First, you will need to open photoshop and create a new image. The size of the image is entirely up to you, I set my resolution to 72pixels. 

File > New > OK.

Step 2: Create a new layer, then select horizontal type tool. Select where on your image you would like to place your text and type what you want the text to say. Keep the colour black and select what size you want the text to be (I have mine set to 380pt). For the font I used Bebas, this was not in the fonts on my photoshop but it can be found at www.dafont.com/bebas.font. Download the file, unzip then install. 

New Layer [1] > Horizontal Type Tool [2] > Write Text [3] > Font [4] > Size [5].

Adding Text.

Step 3: Add another new layer, make sure it is above the text layer. For this layer, you will be creating a full background. You can either create your own with the brush tool or add another image. 
If you use the brush tool, paint whatever pattern you decide and if you choose to soften the sharp lines between the different colours use the tool mixer brush tool (this is found by right clicking on the brush tool).

New Layer [1] > Brush Tool [2] > Paint Pattern > Mixer Brush Tool (optional)[2].

Paint

If you choose to use another image, open it in photoshop and use the rectangular marquee tool to select the whole image. Once the whole image is selected click on edit and copy. Go back to the document that you have created with the writing and on the new layer paste the image.

New Layer [1] > Open New Image > Rectangular Marquee Tool [2] > Copy > Original Image > Paste.

Premade Image.

Step 4: Make sure the layer that has your background image on is selected (the layer you have just made in the previous step). Click on layer and go down to create clipping mask.

Click On Your Layer [1] > Click Layer [2] > Create Clipping Mask [3].


And now you are finished in four simple steps. 

Final.

Hopefully, this tutorial made sense and helped you a little bit.

Sam.


Thursday, 3 November 2016

Make A Header For Your Blog Using Photoshop.

Every blog needs a header rather than a title, I will be helping you make a simple header using photoshop. 

First, you will need to create a new image on photoshop, once you click on new image it will ask you what size you would like the image to be. I chose 1114pixels for the width and 300pixels for the height. 

File > New... > Width 1114pixels > Height 300pixels > Ok.

The background it the first thing that we will be changing, for this you will need to select the gradient tool. In the gradient picker at the top of photoshop, I kept the first block selected. You will also have to select two colours that you want the background to fade from and to. I have chosen green for my first colour (#82c8b2) and white (#ffffff) for my second colour. Then you need to draw a line in the middle of your image from bottom to top.

Gradient Tool [1] > Gradient Picker [2] > Colour [3] > Add the Gradient [4].

Adding a background.
That is the background finished, now to add the banner. You will need to create a new layer and rename this banner 1. I didn't really like the ones that were provided on photoshop so I downloaded some more, you may find one on photoshop that you like if not download one. You will need to find some new brushes, I got mine from www.brusheezy.com/brushes I chose the hand drawn brushes. Download these and unzip the file then install. Once you have installed the new brushes you will need to select the brush tool. Have a look through the brush presets, this is where you will find your downloaded brushes and find the one you are wanting to use. You may need to change the size of the brush, I chose the size 1000px. You will also have to choose which colour you would like your brush, once you have decided on all the settings of the brush add it to your image.

New Layer [1] > Brush Tool [2] > Brush Presets [3] > Size [4] > Colour [5] > Add To Image [6].

Add a banner.


I decide to add two banners, both different colours, add a new layer and rename it banner 2. The brush is still set as what you have just used so the only step now is to change the colour ([5]), then add the second banner to your image. 

Both banners.
For the next step, I will be adding the text but I will be doing this in two different sections. Create another new layer and rename it text 1, then select the horizontal text tool. Next is to choose the font you want to use, again I could not find any on photoshop that I liked, so if you are the same you can download one. I found a font on www.fontspace.com, I chose the messy category and the font beautiful mess. Download the font you would like and unzip the file, once you have done this install the font and it will be added to photoshop. Select the font you have chosen, then select the text size and finally the colour. Position the text box on your image and type the text you want to display. 

New Layer [1] > Horizontal Text Tool [2] > Chose Font [3] > Text Size [4] > Colour [5] > Add Text [6].

Adding Text.
That is the first section of the text, the second section will have smaller and different colour writing (miss this section if you are only adding the one piece of text). Add a new layer and rename it text 2, follow the same instructions as above changing the text font, size and colour. Then add the text to the image. 

That is your header finished. Save the image, make sure you set the format in save as to JPEG. 

Finished Look.

Hopefully, this tutorial has helped and thanks for reading.

Sam.


Wednesday, 2 November 2016

Things To Make Your Blogger Blog Look Better.

When scrolling through other people's blogger blogs I realised how many of them looked like clones and mine was one of them.
This was how my blog looked:
Cloned.
My blog was using one of the simple themes, still had the blogger navbar and all the information running down the side of the page.

So I have changed my blogger blog to make it look less like a clone blog. Here are some things that will help you along the way with making your blog look less blogger-ish and cloned.


Add a header to your blog.

Make a header (on photoshop or gimp), to upload it to your blog click on layout. Find the header gadget and click on edit. Click browse images and upload your header from your computer. Mark the box that says 'instead of title and description' and click save.

Layout > Header Gadget > Edit > Browse Images > Upload > Click 'Instead of Title and Description' > Save.


Add a different theme.

You can google 'blogger themes' and find a lot that are easy to download. To change the theme on your blogger click on template in your dashboard column. In the right-hand corner of your screen will be a button saying 'backup/restore' (before you upload your theme back up your blog). Click this, then click on choose file and upload your new theme template. Or if you are confident with HTML and CSS you could change the simple theme to suit your preferences. 

Find a Theme > Layout > Backup/Restore > Choose File > Upload New Theme > Save.


Remove the about me widget.

Click layout on your dashboard panel, find the about me gadget. Click on edit and then click remove at the bottom of the gadget page. Instead of having the about me section on the home page, have an about me page.

Layout > About Me Gadget > Edit > Remove > Save.


Remove the blogger navbar.

Click layout on your dashboard panel, find the navbar gadget, click edit and turn off.

Layout > Navbar Gadget > Edit > Turn Off.


Use social media.

This an easy one, promote your blog on your social media accounts but also do the same back, promote your social media accounts on your blog. Some readers find it easier to contact people on different social media platforms rather than on the blog you created. So add your social media accounts to your 'about me' page or have social media icon links on your home page, make sure they are visible and work. 


Hope this helps, any other suggestions would be appreciated.

Sam.


Tuesday, 1 November 2016

Move the Search Bar in Opencart

For this tutorial I will be showing you how to move the search bar in Opencart, I will be using my cPanel File Manager. I will be moving the search bar underneath the cart button and make them the same size, on the right-hand side of the screen.


This is where I will be moving the search bar.


On your file manager, you will need to locate header.tlp (path -catalog/view/theme/default/template/common/header.tlp). In this folder, you will need to change a few lines of the code.

On line 72 it should read <div class="col-sm-4”>, this needs to be changed to <div class="col-sm-9”>

Now find line 81, you will need to change a few lines of code. It should read: 

</div>
      <div class="col-sm-5"><?php echo $search; ?> 
      </div>
      <div class="col-sm-3"><?php echo $cart; ?></div>

    </div>

change that section of code to:

</div>
<div class="col-sm-3"><?php echo $cart; ?></div>
<div class="col-sm-3"><?php echo $search; ?>
</div>


Save the changes and refresh your store and the search bar will be underneath the cart.

Final Result.
Sam